Pages

Wednesday, February 9, 2011

Automate The Installation Of Windows XP...........

XP Automation
You can create a CD that can install Windows XP automatically, putting in all the details and answering all the dialog boxes.

The secret behind this is the answer file, which tells Windows what to do while it's installing. The answer file can be created using Windows setup manager.

Using this tool, you can make the answer file so powerful that you can even tell Windows to include or exclude individual components, set the display resolution, and more.

Here's the Steps involved in creating XP Automated Installation Disc :

Step 1: To begin with, insert your Windows XP installation CD into the drive and copy the entire contents of the CD to a new folder on your hard disk.

Step 2: Navigate to the Support > Tools folder on the CD and double-click the Deploy.cab file. Copy all the files to a new folder on your hard disk.

Step 3: The crucial part begins now, creating the answer file. To execute the windows setup manager, double click the Setupmgr.exe file from the contents of the Deploy.cab, which you just copied onto the hard drive.

Step 4: The first few steps of the wizard are self explanatory. Select the following options from the successive dialog boxes. Create a new answer file; Windows unattended installation (Select the appropriate Windows version); "Fully automated"; "No this answer file will be used to install from CD"; and finally, accept the license agreement.

Step 5: Under the General Settings, you can customize the installation of Windows by providing the default name and organization, display settings, time zone and the product key. Fill in the fields using the drop-down list or by keying in the details. If you don't select an option from the drop-down list, the default values will be used.

Step 6: After you are done click Finish and save the answer file as "winnt.sif" when you are prompted. Advanced users can further tweak the answer file by referring to the Help file called Ref.chm in the same folder.

Step 7: Finally copy the answer file to i386 folder in the Windows XP installation folder you created in the beginning.

Step 8: To burn a bootable installation disc, you need the boot sector of the Windows XP CD. Download it from here bootfiles.zip

Step 9: Launch Nero and select CD-ROM (Boot) from the New Compilation dialog box. Under the Boot tab, specify the boot sector file you downloaded and extracted. Set the emulation as "No emulation", and keep the boot message blank. Most importantly, remember to set the "Number of loaded sectors" as 4.

Step 10: Under the Burn tab, set the write method to disc at-once. Click the New button to to begin adding files and folders to the compilation. Drag all the contents of the Windows XP installation disc that you copied to your hard drive (with the answer file in the i386 folder) into the left pane. Insert a blank CD into the optical drive and hit burn button. Your windows automated installation Disc is ready! :)

How to update Win XP Offline ???

Here are the quick steps..
 
1. Download ctupdate Version 4.1 of  from Heise's website.
2. Create a new folder and unzip the downloaded zip file ctupdate41.zip to that folder.
3. Double click the file " UpdateGenerator.exe " from the extracted files, in the options menu choose " Windows XP ", check " English " , check on " Create iso " for creating iso image of updates which you can burn on a cd. Now click start, this initiates the download of all required XP patches directly from Microsoft's servers.
4. When the script announces, "Download image creation successful," close the c't updater windows .
5. Now navigate to  ..\ctupdate4\iso folder and burn the iso image created to a blank cd using nero or any other iso burning software.
6. For Windows XP in English, that file is named " wsusoffline-wxp-enu.iso "
7. Insert the new autorun CD into the drive of the computer to be updated, click "Start" on the c't update pop-up menu, and go out somewhere while script does all the heavy job.
8. Every month, go through this process again, starting with Step 3, to update your system to latest updates. Now only new patches are downloaded, so downloads after the first one go much quicker.
This script driven offline windows update method is very convenient for new windows installations, routine updates and the library it creates is also a valuable data against that awful day when Microsoft abandons support of XP in favor of a sexy new OS Windows Vista.

I have never had a problem with the c't update and I hope this little  explanation of offline update is helpful.

Create Shortcut For Safely Removing Hardware Devices...............

Create Shortcut For Safely Remove Hardware
Every time you want to safely unplug removable hardware devices like pen drive or removable harddisks from your system you have to struggle with tiny little system tray menu icon to remove hardware devices.
Now here's an easy way to do that, just create a shortcut for safely removing hardware devices icon on desktop and just double click on that icon to safely remove hardware devices.
To create shortcut for Safely Remove Hardware, follow these simple steps:
Right-click on the desktop, select ‘New’ and then ‘Shortcut’ and put this in location field RunDll32.exe shell32.dll,Control_RunDLL HotPlug.dll
Create Shortcut For Safely Remove Hardware
Then click ‘Next’ and call the shortcut ‘Remove Hardware’.
Create Shortcut For Safely Remove Hardware
To make the default icon little pretty, right-click the icon, choose ‘Properties’ and then the ‘Shortcut’ tab, click on ‘Change Icon’ and in the ‘Look for icons’ box type %windir%\system32\HotPlug.dll
Create Shortcut For Safely Remove Hardware
This is much easy way to unplug removable devices in Windows than traditional one, all you need do is double-click your desktop icon to safely remove any devices before unplugging them.

Best Alternative to QuickTime player for Windows Users..............

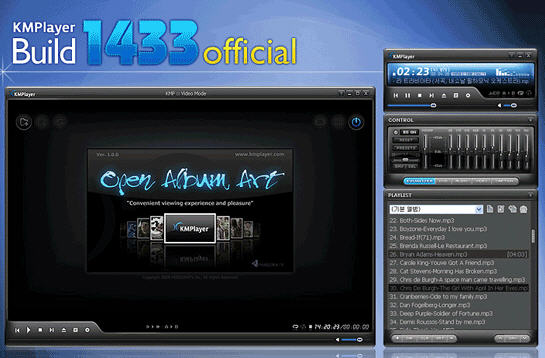
km player screenshot
Apple QuickTime player is terribly slow on windows platform specially for the playback of .mov files and I think most of the people who have played back .mov files in windows QuickTime player must have experienced this.

Why no to QuickTime player for windows:

1. Takes time in startup.
2. Lots of bugs.
3. Loads host of other bloat ware along with it like apple software update.
4. Not fully functional media player, limited features , you have to buy pro version to get more features.

Why yes to KM Player:

1. Starts much faster the QuickTime player.
2. Freeware and fully functional.
3. Plays virtually any type of video file formats.
4. Installation file size is just 11mb as compared to 22mb of QuickTime player.
There are other alternatives like QuickTime Alternative but it wont plays QuickTime files encoded in various bit rates and codec's.
I have tested QuickTime Alternative on various .mov files and in most cases QuickTime Alternative fails to play most of the QuickTime files.
The only downside of KM player is that if you need to encode .mov files you need to have Apple QuickTime player installed on your system, for average users who don't do encoding or video production KM player works great.
You can also read the positive user reviews of KM Player at  CNET Downloads.

Download Epic Browser The first web browser for Indians..........


Epic browser is the first web browser developed in India by software company from Bangalore called Hidden Reflex. It is based on the latest Mozilla Firefox engine.
Epic browser has wide Indian language support, Indian themes and wallpapers to customize the browser look and feel.
Its also the first web browser in the world with antivirus build right into it.
This video explains the epic browser's look and feel:
Epic browser will truly give you Indian browsing experience. Download Epic Browser

Most Useful Web Applications................

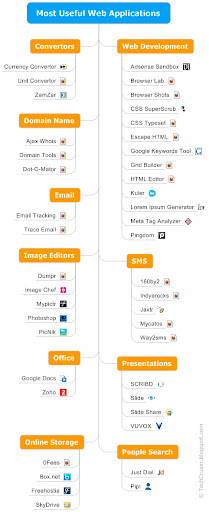
This is the list of most useful web applications present all over the web.
most useful web applications currency convertor unit convertor Online file conversion adsense sandbox adobe browser lab browser shots css superscrub css typeset escape thml grid builder html editor adobe kuler loerm ipsum generator meta tag analyzer 160by2 free sms indyarocks free sms jaxtr mycantos way2sms scribd slide slideshare vuvox just dial skydrive freehostia box.net 0fees google docs zoho dupmr imagechef mypictr photoshop picnik email tracking trace email dot-o-mator domain tools ajax whois

How to Create Passport Size Photos in Photoshop ???

You can easily create passport size photos in photoshop and print it using your photo inkjet printer. 
First of all open up this PSD template in photoshop . I have created guides in this PSD which will help you to place 36 passport size photos ( 1 x 1.5 inch ) at 300dpi.
Next open the image from which you want to create passport size photos and crop the face from the image at following dimensions Width: 1inch , Height: 1.5inch and Resolution: 300dpi.
passport size photos
Now copy this image and paste it over to the PSD template. Copy and paste multiple times to properly align the images in guides.
passport size photos
For pasting images quickly all over to the 36 rectangular boxes, first paste the images on the first row then copy and paste each row.
Now just print this document on a decent photo paper using a good quality inkjet photo printer. Use a blade and steel scale to cut the images rather than scissors and your passport size photos are ready.